
The last lesson plan was all about introducing adjectives.
This lesson plan is going to be all about describing the location of objects. We are going to create words that describe the location of an object with respect to its surrounding objects. Whether the object is under the bed or beside the Almirah, forming these kinds of sentences is what your student will learn in this lesson plan.

If you look at most common sentences that describe an event or activity, you’d see that they have spatial and temporal information contained in them. By this, I mean that they contain information about where the activity/event took place and when it took place. In this plan, I will discuss how you can teach your student about specifying the location of an object in a sentence. I’ll cover the temporal component in the next article.
We will specify location using the grammar tool of ‘prepositional phrases’. It is quite easy a concept to grasp and I suggest you go through this wonderful link if you need a refresher on this.
We will be using the subject list that we built up in the last lesson plan and describe their location. In a short while, you’ll see what that subject list in action in a tabular structure. We have been building this subject list all along starting from scratch and if you’d like to see how that was done then you must visit the last three lesson plan articles – lesson plan 1, Lesson plan 2, Lesson plan 3.
We are going to use these subjects in the first and the last column of the table in this lesson plan.
The structure of sentences in this lesson plan is going to be
Subject (1) + is/am/are + in/on/at (and other prepositions) + subject (2)
For e.g. ‘He is in the house’ – ‘He’ and ‘the house’ are subjects, and ‘in’ is the preposition. Another example: ‘My friends are at the playground’ – ‘My friends’ and ‘the playground’ are the subjects and ‘at’ is the preposition.
Notice that in the above sentence structure we are telling the location of subject 1 in relation to subject 2 for e.g. in relation to the desk where is the chair? – Answer: ‘The desk is beside the chair’. Creating these answers is what your student has to learn and this is exactly what he will learn through the table that will follow shortly.
So let’s begin the actual lesson. As always, we start with the vocabulary section.
Vocabulary List
- Prepositions that are commonly used to describe location: in, at, on, beside, inside, above, below, under. These are the must haves and but you should add more words to this list if you can think of them.
- Here, there – these words are adverbs and I’ll use them to describe object location. It’s as simple as – I am here, the bag is there etc. But as you know what’s obvious to us isn’t so obvious for your student. So we’ll put an explicit focus on this in the table.
So after you list down the vocab words just go through their meaning with your student, for e.g. ‘in’ means what in typical sentences, ‘on’ is used to denote what?. Use examples to clarify the typical usage of these words – ‘in the playground’, ‘on the table’, ‘under the desk’. With examples explaining the meaning is quite easy. Be innovative! with your examples.
Ok, so with this background made, we are all set to move on to the crux of this article. No surprises here. As always it’s the table that puts everything done so far in this lesson plan into context.
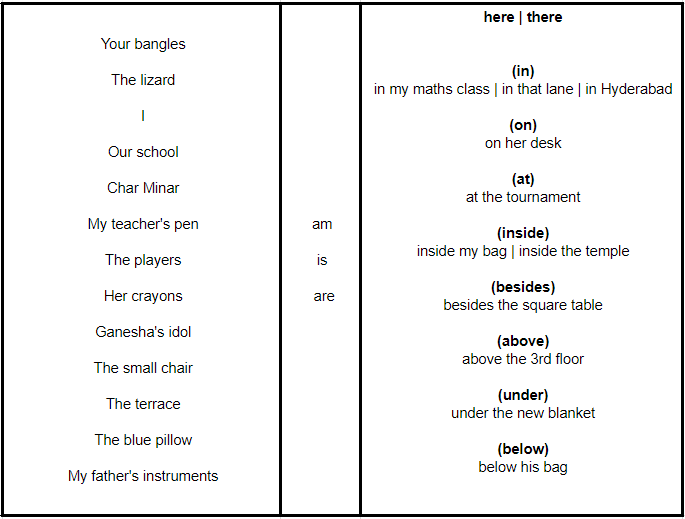

And here are the sample sentences:
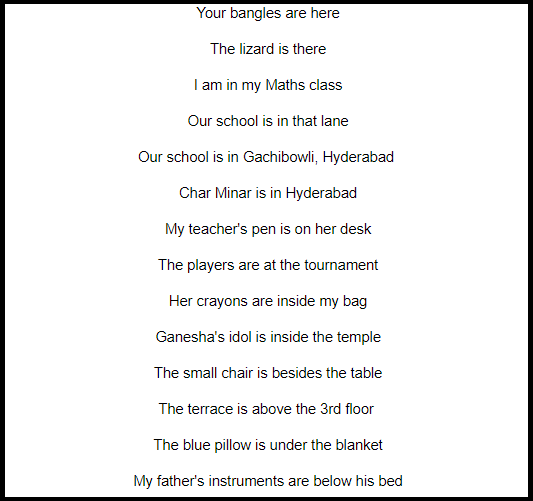

As I have already mentioned in the previous lesson plans, the table encapsulates the main idea of a lesson plan. Everything else, including the exercise and activities (link at the end of this article) and the vocabulary section, is created to help the student understand the table and form sentences from it.
Use this lesson plan as an opportunity to get your students to name all the objects that surround them in English. And then ask them to specify the position of the chosen object w.r.t its surrounding objects. Create sentences like: The chair is between the blackboard and the table. My desk in front of Anjali’s desk. My desk is behind Ruhi’s desk. Keep adding these new objects and their location to the table and keep creating new sentences from the table. Putting things into the table ensures that everything is structured and easy to follow for the student.
The negative sentences


For every positive sentence, there is a negative sentence. And if your student has understood the positive sentences so far, then learning the negative of these sentence would be really a cake walk for him. Teaching about negatives does make a lot of sense. Why? Because now for every question, your student has another answer choice – he can say no as well. Let’s pick up a positive sentence – The ball is on the table. It’s negative version – The ball is not on the table. It’s as easy as that to create negative sentences for the sentences in this table.
You must recognise your power as a teacher
How many sentences to teach? How many new words to introduce? When to stop? – You have to take the call on your own. After all, you are the teacher. You must answer these questions based on one of your biggest asset – intuition. As you gain more experience, as a teacher, the answer to these questions will come more easily (or say intuitively) to you.


You can only make your students learn the sentences that we discussed so far by asking the right questions? Questions whose answers lie in the table. I just cannot stress enough on it. You shouldn’t go into the class, draw the table on the board, and expect your students to learn the table sentences by themselves. You have to ask them. Ask them questions whose answers lie in the table. Ask them repeatedly but patiently.
At the end of the day, this content in itself can only make a little impact in your students’ progress. You the teacher have to bring this whole lesson plan to life – by asking the right questions, by creating suitable background situations and by your patience and empathy. That’s how your student will make real progress.
Go slow. Deliver bite-sized. And let your students digest what you just taught. In my experience, that’s the best way to teach English as a volunteer.
Like this story? Or have something to share?
Write to us: contact@thebetterindia.com
Connect with us on Facebook and Twitter.
NEW: Click here to get positive news on WhatsApp!
If you found our stories insightful, informative, or even just enjoyable, we invite you to consider making a voluntary payment to support the work we do at The Better India. Your contribution helps us continue producing quality content that educates, inspires, and drives positive change.
Choose one of the payment options below for your contribution-
By paying for the stories you value, you directly contribute to sustaining our efforts focused on making a difference in the world. Together, let's ensure that impactful stories continue to be told and shared, enriching lives and communities alike.
Thank you for your support. Here are some frequently asked questions you might find helpful to know why you are contributing?