Teaching English 101 – Empower Your Students With These Simple Tips
Lesson Plan 2: This is the second post in a series of 'How to teach English' posts, by Raghav Nyati.

In the last lesson plan, we discussed how your student can introduce himself and the people around him. This lesson plan builds upon it. This lesson plan will equip your student to describe the relationship he shares with the objects and people around himself.
The aim of this lesson plan is to help the student understand that objects and entities that surround him usually belong to someone. For example, the red pen kept on the desk might belong to the teacher, or the name ‘Raghav’ might belong to me because it’s my name after all. Teaching these association (links) between the entities and the person they belong to is very important. It helps the student make sentences that reflect the reality more comprehensively. Look around, you’d see that almost everything around you belongs to someone or something – the cap belongs to that pen, the shirt belongs to you, and the apron belongs to your mother. This association is, in many cases, fundamental to the description of an object. ‘My shirt’ is way more specific and meaningful to you than simply ‘a shirt’.
This lesson plan is going to be a little complicated owing to the vast gamete of things that we are going to cover. But it is still going to be very hands on. And if you don’t lose faith in between, your student will be immensely richer in his English after you have taught him this lesson. In fact, this lesson is one of those hard to climb stepping stones after which you’ll discover that things become easier again.

And btw by the end of this lesson plan, you’d have a huge list of things that your student can speak about. These things are nothing but what the grammarians say – subjects. So if you are writing a sentence about your cat, then ‘your cat’ is the subject, and, if you write a sentence about ‘the moon’, then the moon is the subject. The leftmost columns in the tables (that you’ll encounter next) contain these subjects. And a large list of subjects is what you want. Because you want to empower your student to speak something in English about as many things as he knows about. All these ‘things’ fall under the subject category. In the next lesson plan, you’ll see how adjectives can be used to describe a lot more about our subject list. This lesson plan just introduces a lot of new subjects (using associations) and a few basic sentences to put these subjects into action.
With our expectations set, let’s get started.
I will give a very short vocabulary section here that just covers the essential. You just need to introduce students to the spelling of these words through this vocabulary section. The meaning and usage will only become clear once you move on to the table section.
Vocabulary:
- Determiners – my, our, your, his, her, their, its
- This, that these, those
- Personal pronoun (on the object side) – mine, ours, yours, his, hers, theirs
Now comes the core teaching content. We begin with the smallest word in English – ‘a’. That’s our first supporting idea.
Supporting idea 1: The articles
‘The’ vs ‘a/an’ – you must explain to the student the most common use of the articles ‘the’ and ‘a/an’. Let’s see what that use is: ‘the pen’ refers to a pen which you already know about but ‘a pen’ or pens refer to pens in general. In the subjects that you’ll encounter in this lesson plan, you will find both ‘the’ and ‘a/an’ being used.
Supporting idea 2: My Friend

Let’s create our first ‘owned’ subjects.
What is that?
It is nothing but:
My-your-his-her-our-their-its (these words are called determiners in grammar circles, in case you were curious) + person (friend, mother, classmate etc.) or object (pencil, water bottle etc.)
Examples of owned subjects: my friend, her pencil, your parents
To introduce these new subjects, use this table:
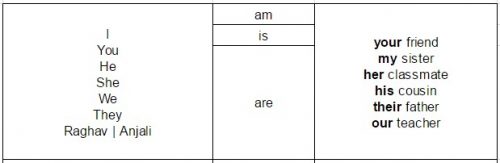
Sample sentences (from this table): I am your friend. She is my sister.
Supporting idea 3: Pointing at objects
This, that, these, those – yup, teach your students to start their sentences with these phrases. These 4 ‘pointing’ words require (in most cases) that the speaker points at something and then says them. For e.g. when you say ‘That ball is mine’ you are pointing at a certain ball which belongs to you. Looks obvious right? But be explicit about this thing to your student. Pointing at different objects and attaching this-this-these-those to them is a fun exercise that engages the students quite well.
Let me give you another small table to introduce these pointing words:
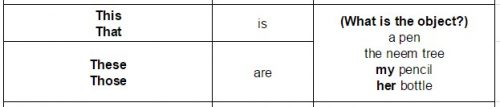
Notice: how we are using the words (my, her) learnt in the last table in this table.
Supporting idea 4: Those Flowers are mine
Now let’s learn the reverse of the first table – subject + is/are + mine-yours-his-hers-ours-theirs. Along with this, we’ll also add a little more nuance to our object pointing approach. Instead of simply using that, this, these, those, now you must also introduce this pencil, that person, these plants etc. It works just like the My-your-his-her + person/object. Let’s understand this through a table:
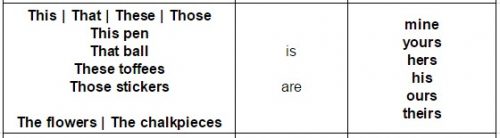
Sample sentences: that ball is mine, the flowers are hers.
Core table
As I have already mentioned in the last lesson plan, the table encapsulates the main idea of a lesson plan. Everything else, including the exercise and activities and the vocabulary section, is created to help the student understand the table and form sentences from it.
The four supporting ideas have set the stage for the core table. Everything we have learnt so far in this lesson plan and the previous lesson plan will be a part of this table. So obviously the table is going to be a little complicated. But that’s where the real action begins. In real life conversations, the student will never be able to fall back on a single table to say all the sentences that he wants to. That’s where these compound tables (like the one you’ll see next) come in handy. This compound table juxtaposes a lot of different phrases and words together. This will help the student create hundreds of sentences (from this table itself) on a lot of different subjects.
You will play a crucial role in enabling the student to form his first 30 to 40 correct sentences from the table. If your student understands this table and forms sentences from it on his own then you are set.
Deconstruct

After you read the table you’ll find a picture containing a few sample sentences – sentences that are created from words and phrases in the table. You must deconstruct a few sentences from this sample. By deconstruction, I mean that you break the sentence into its words and spot these words in the table. You must share this process with the student after you show him the table. That’s how he will learn how to form sentences from this table on his own.
All set? Here comes the core table:
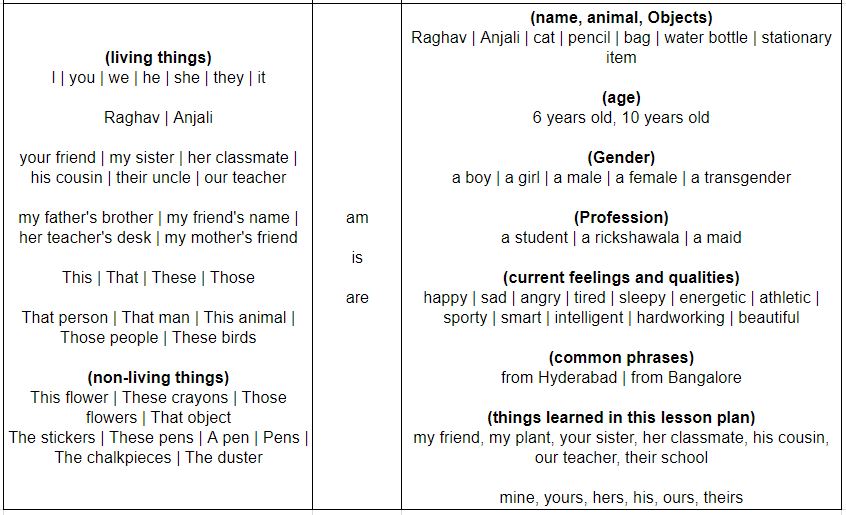
And here are a few sentences created from this table:
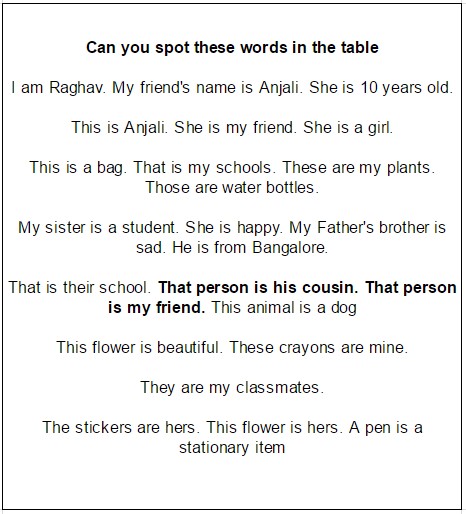
Table derivatives 1: Buckets
Apart from the ownership usage which we have been talking about till now, you can also create sentences from this table that describe the generic objects in terms of their larger family e.g. a snake (falls into the leftmost column) is an animal (falls into the rightmost column). A pen is a stationary item etc. Teaching about these buckets is also a useful exercise and helps the students put different objects into larger ‘buckets’ like – animal, place, food (e.g. sentence: A biryani is a food item) etc. To find out more about this kind of usage, see the exercise and activity for this lesson plan (link below the article).
Table derivatives 2: The negatives
The negative: For every positive sentence there is a negative sentence. And if your student has understood the positive sentences so far, then learning the negative of these sentence would be really a cake walk for him. Teaching about negatives does make a lot of sense. Why? Because now for every question, your student has another answer choice – he can say no as well. So let’s just pick up a positive sentence – That ball is mine. Its negative version is – That ball is not mine. It’s as easy as that to create negative sentences for the sentences in this table.
Customization

I have already emphasised this point in the last lesson plan. The idea is that the words that fall under a particular category (highlighted in bold in the table) must be customised based on your student’s background. For e.g. if your student is from Jaipur then put Jaipur there instead of Hyderabad. If he is 15 years old, then put 15 there instead of 6 or 10. This will make the table as relatable as possible for your student. It’s not hard to do. You are the teacher and you must find out what your student’s background is. Then put the relevant details in this table. If you teach multiple students, then put some common background attributes in the table.
Don’t get lost in the corner cases

This table is a little complicated. A few things that I have told you about it till now will not make immediate sense. But as you start teaching your student, things will become clearer. After all whatever I have told you so far is written with the classroom in mind.
You will also find that, while teaching this lesson plan, lots of sentences will come to your mind that can’t be fitted into this table. Don’t worry. Live with that. Teach your student a few of these sentences when you must but mostly stick to the sentences that can be fitted into this table. Your aim is not to cover the corner cases. As you move on to the future lesson plans (which I will be sharing on this website), you will find that most of the previously uncovered sentences will get covered. So don’t worry at all about what you couldn’t cover in this lesson plan.
You must recognise your power as a teacher

How many sentences to teach? How many new words to introduce? When to stop? – You have to take the call on your own. After all, you are the teacher. You must answer these questions based on one of your biggest asset – intuition. As you gain more experience, as a teacher, the answer to these questions will come more easily (or say intuitively) to you.
You can only make your students learn the sentences that we discussed so far by asking the right questions? Questions whose answers lie in the table. I just cannot stress more on it. You just can’t go into the class, draw the table on the board, and expect your students to learn the table sentences by themselves. You have to ask them. Ask them repeatedly but patiently.
Btw all the sentences that your student has learned from these tables will become more relatable only when you are able to put a little background to them.
At the end of the day, this content in itself can only make a little impact in your students’ progress. You the teacher have to bring this whole lesson plan to life – by asking the right questions, by creating suitable background situations and by your patience and empathy. That’s how your student will make real progress.
Go slow. Deliver bite-sized. And let your students digest what you just taught. In my experience, that’s the best way to teach English as a volunteer.
Download this lesson plan along with beautifully crafted exercises and activities, and get started on your English teaching journey right away. To learn more about volunteering and teaching English, visit the Volunteer Curriculum website.
Like this story? Or have something to share?
Write to us: [email protected]
Connect with us on Facebook and Twitter.
NEW: Click here to get positive news on WhatsApp!

If you found our stories insightful, informative, or even just enjoyable, we invite you to consider making a voluntary payment to support the work we do at The Better India. Your contribution helps us continue producing quality content that educates, inspires, and drives positive change.
Choose one of the payment options below for your contribution-
By paying for the stories you value, you directly contribute to sustaining our efforts focused on making a difference in the world. Together, let's ensure that impactful stories continue to be told and shared, enriching lives and communities alike.
Thank you for your support. Here are some frequently asked questions you might find helpful to know why you are contributing?


This story made me
-
 97
97 -
 121
121 -
 89
89 -
 167
167